3. Data Preparation#
In this tutorial we will use following data:
Elevation data [palsar 12.5m resolution] which can be downloaded from Earthdata Website from NASA. It needs login account. Before downloading create an account. Creating an account is very easy. Elevation data with lower resolution (SRTM 30m or ASTER DEM 30m) can be downloded from Earth-explorer or Earthdata Website from NASA.
Sentinel-2 image can be downloaded from https://scihub.copernicus.eu/dhus/#/home. This website also needs a login account. The process of creating account is explained in the following sub-section.
3.1. Create User Account for Sentinel Image#
Open https://scihub.copernicus.eu/dhus/#/home and, as shown in the following figure, click on the icon and click sign-up link.
Log in to scihub (to download Sentinel data)

Fig. 3.1 Log in to scihub (to download Sentinel data)#
3.2. Find your data#
Log in to your account. Move the map to the region of your interest. Following steps correspond to the image below (as seen in Mozilla firefox web browser).
Click three lines at the top left of the website screen as shown in the figure.
You can find three different Sentinel Missions to select from. The details of each satellite mission can be found in the website. In this tutorial, we will use Sentinel-2 mission data which provides image in visible and infrared bands. Scroll down to show Sentinel-2 data.
Select Sentinel-2.
There are many options which you can leave empty. Let us reduce the cloud cover to less than 5% show that we can get clear image.
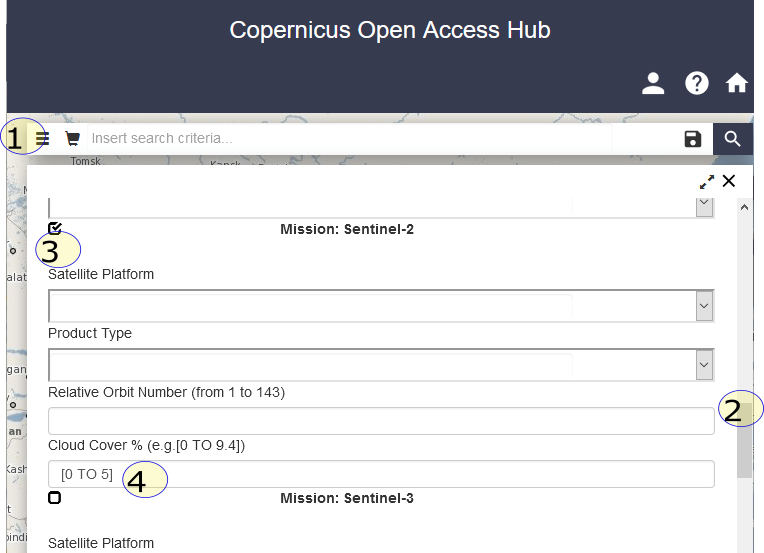
Fig. 3.2 Select Sentinel-2 (check the box)#
3.3. Select your region#
Now we select the region of interest on the map. Follow the steps below corresponding to Figure @ref(fig:select_region).
The map navigation mode can be changed into area (drawing) mode by clicking the icon shown in the figure. Now draw a rectangle to cover your area of interest by dragging the mouse from top left corner to the bottom right corner. Now you can click search icon on the left.
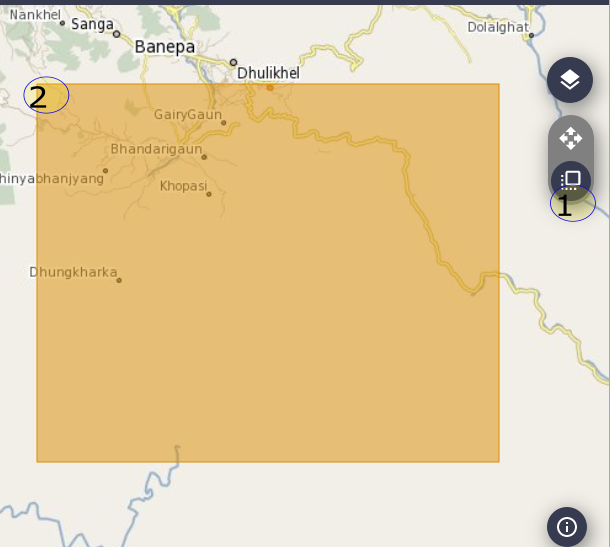
Fig. 3.3 Select the region of interest#
3.4. Download data#
3.4.1. Sentinel Image#
After you click on the search icon, you will find several products which matches your search criteria. Each product displays the URL for download, a thumbnail image and details such as mission name, date time of data capture etc. As seen in the figure, four icons will be displayed only when you hover your mouse over the product. You can check more details using product details icon. It is necessary to check whether the data covers your area or not. There are two types of Sentinel-2 products, namely, L1C and L2A. L2A is atmospherically corrected image and it is recommended to use L2A product otherwise you will have to do atmospheric correction which is not explained in this tutorial. Once decide to download a product, you can click on the download URL or the download icon which is displayed when the mouse is above the product. Following image illustrates the screen of search result.
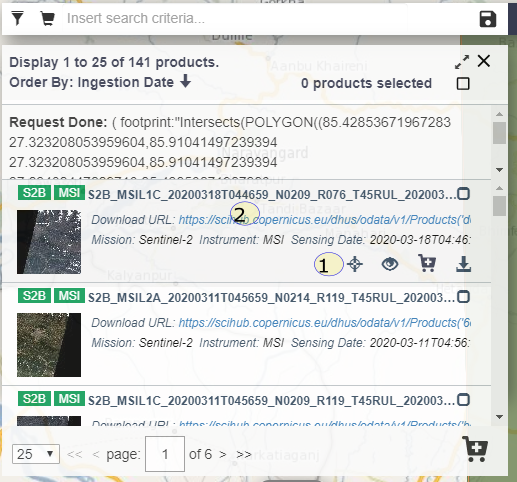
Fig. 3.4 Select the product (Sentinel image)#
3.4.2. Elevation data#
As explained before, elevation data can be downloaded from various websites. For the purpose of this tutorial, I have already prepared elevation data by merging multiple elevation data and then clipping to the region of interest. It can be downloaded by right clicking the following URL and saving to your workspace.
3.4.3. Other data#
You can find the data related to geology and rainfall with the corresponding government agencies. Rainfall data can also be downloaded from TRMM mission at a resolution of \(25km^2\). . However, in this tutorial we are going to use only elevation data and sentinel image.