| airline | airline_id | source | dest | codeshare | stops |
|---|---|---|---|---|---|
| EY | 2222 | KTM | AUH | NA | 0 |
| YT | 16133 | KTM | BDP | NA | 0 |
| YT | 16133 | KTM | BHR | NA | 0 |
| YT | 16133 | KTM | BIR | NA | 0 |
| RA | 3637 | KTM | BKK | NA | 0 |
4 Database Management
Database is the backbone of any information system. In this chapter we will learn about database and its handling in QGIS. We will also learn SQL (Structured Query Language) which is similar in most of the database software.
(Note: This chapter is under construction.)
4.1 What is information system
Information is defined in Merriam Webster (https://www.merriam-webster.com/dictionary/information) as “the communication or reception of knowledge or intelligence”. Information can be obtained from various sources in various ways. In early days of human civilization we needed very little information. With the modernization our information need has become very complex. Before we started using computer, most of the information in a government or commercial organization were kept and maintained in files and register. As such information retrieval was time consuming. Therefore we can say that in early times information system consisted of drawers, cabinets, files and registers. A simple information system consists of:
- Hardware : Computer
- Software : Database management software
Information system allows an organization to keep all the information in an organized way so that it can be easily updated and retrieved. In order to maintain an information system we need a database management system (DBMS) software. There are several free and proprietary database management software as listed below:
- PostgreSQL (free DBMS)
- MySQL (free)
- MS Access (Proprietary, Microsoft)
- Oracle Database (Proprietary, Oracle)
- SQLite (free) etc.
We will use SQLite to learn some basic functions of database management system.
4.2 Basic tutorial for Database management
First of all, download sample database from https://www.dataquest.io/blog/python-pandas-databases/. Scroll down to find the link to sample database or download directly from https://www.dropbox.com/s/a2wax843eniq12g/flights.db?dl=0. The website was accessed on 29ˆth December, 2018. In case you don’t find the database at the above location, you can download another database from http://www.sqlitetutorial.net/sqlite-sample-database/. The two databases are different however you can work following the steps explained below (some of the steps may not be possible in another database).
4.2.1 Database tutorial
4.3 Install Softwares
4.3.1 PostgreSQL
You can download the PostgreSQL installer from this link. While installing you can just follow the installation guidance. Only recommendation is to use simple password for the postgresql user. As we use it for personal database, we can use simple password like 1234 or postgres etc.
4.3.2 PostGIS
PostGIS is spatial extension for PostgreSQL database management system. It can be installed by using stackbuilder provided with the PostgreSQL installation. You can follow this link to install PostGIS. When asked for creating sample postgis database, we can select yes.
4.4 Using PG-Admin
If you install PostgreSQL using above link, PGAdmin will be installed along with the software. It is the graphic user interface for handling PostgreSQL database. We can start PGAdmin as any other software from start menu in the left-bottom of the windows.
 In the above user interface, we can see multiple servers such as PostgreSQL 9.6, PostgreSQL 12. If we install PostgreSQL for the first time, we will have one single server running on the port 5432, if we accept the defaults. In the present tutorial we will use pgfortutorial as shown in the above tutorial. You should use the one which you have installed.
We have two databases under the server named pgfortutorial. One is named postgres which comes with the installation of PostgreSQL while the other one is a PostGIS sample database which is only created when we choose to do so while installing PostGIS. We will understand the user interface by practicing.
4.5 Practice exercise
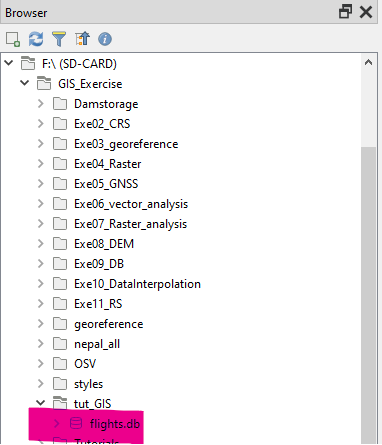
In this exercise, we will create a database similar to the one we downloaded from dropbox as explained in the previous section. Let us check the contents of database in QGIS. As we explore the browser to the downloaded location we can find the flights database as shown in the following figure.
Let us drag and drop the database to the QGIS interface. We will get a dialog box to select the layers which contains three tables. Select all the layers. We will not see anything displayed in the map as all the layers are non-spatial tables.
4.5.1 Contents of database
Observe the database contents by following the steps below. There are various ways to observe the three tables. We will use the QGIS interface to understand the properties of the tables.
- Right click airlines layer \(\rightarrow\) Properties
- Select the Fields tab on the left side-panel
We can see the types attributes listed as shown in the following figure.
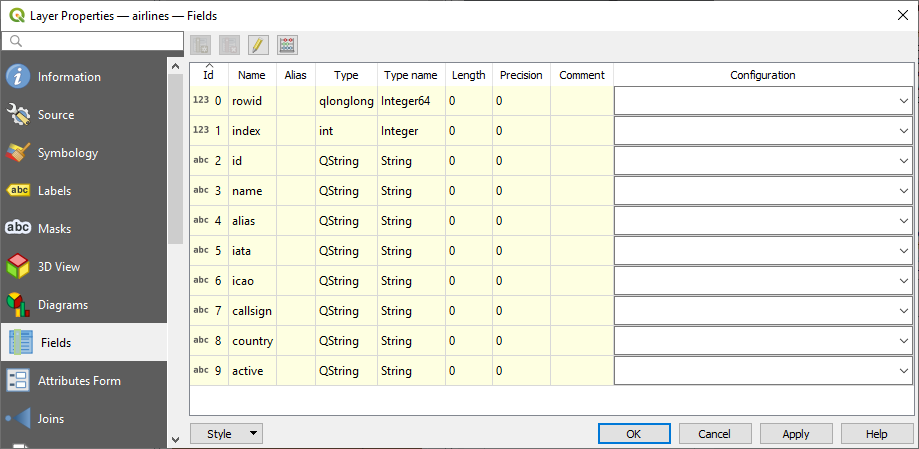 In this table rowid and index are integers and all the other fields are strings. We will create a database with similar tables in postgresql.
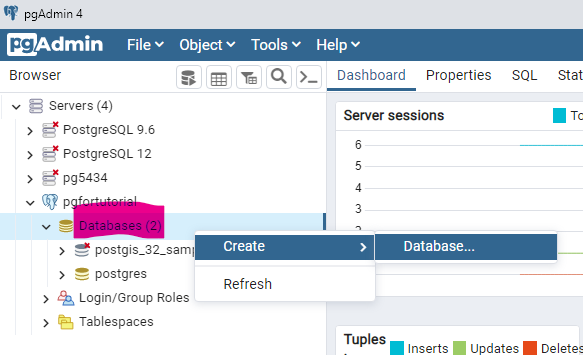
4.5.2 Create database in the PostgreSQL
Right click the Databases and select Create \(\rightarrow\) Database (see figure).
Create New Database Fill the required fields as in the following figure. Save the database.
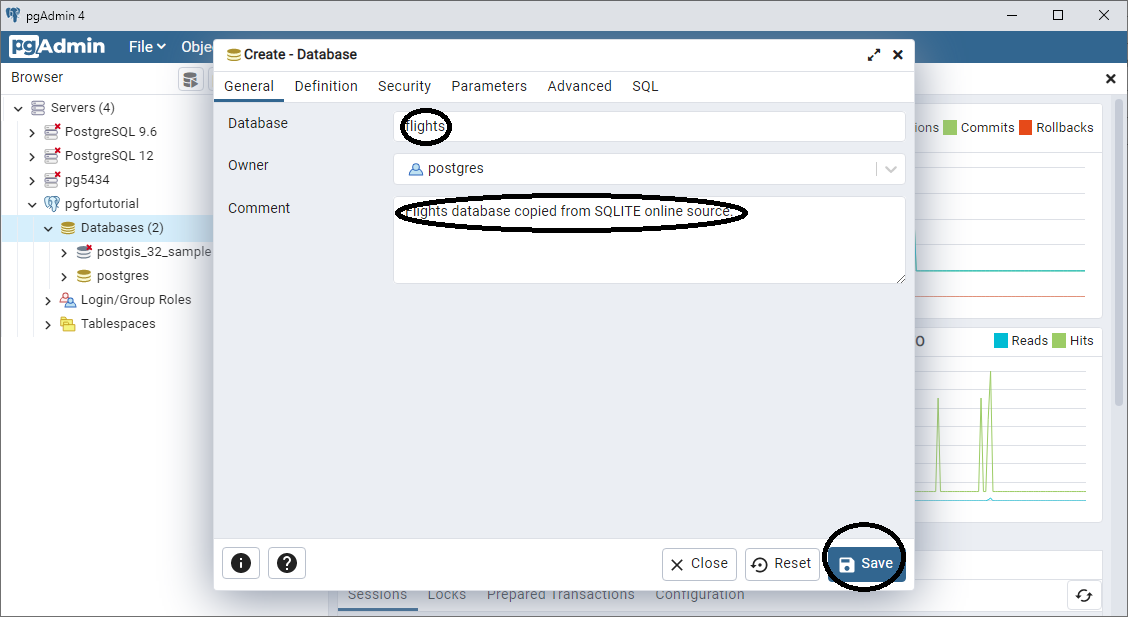
Select the name of new Database Now let’s create a table similar to the airlines table available with sqlite database. We need to write a SQL as shown below.
CREATE TABLE airlines
(
    rowid bigint NOT NULL,
    "index" integer,
    id character varying,
    name character varying,
    alias character varying,
    iata character varying,
    icao character varying,
    callsign character varying,
    country character varying,
    active character varying,
    CONSTRAINT airlines_pkey PRIMARY KEY (rowid)
)
What is the meaning of the above SQL?
- It will create a table with the fields listed in the SQL above.
- rowid is bigint and it cannot be NULL. That is, it must not be empty. This column has unique value (No duplicate) which is determined by the last row of the SQL. Primary key can be a single column or combination of columns.
- index field will be an integer.
- Other fields will be character varying which is equivalent to the variable length string.
How to do it?
- From menu click Tools \(\rightarrow\) Query Tool.
- In the SQL window copy and paste the above code. Then click Execute/Refresh button or just use F5-key on the keyboard.
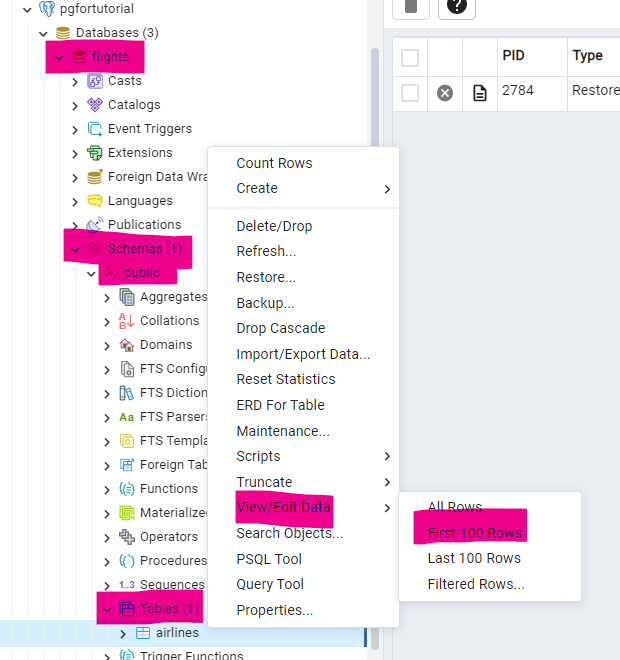
- The table thus created can be browsed by expanding the database (flights) \(\rightarrow\) Schema \(\rightarrow\) public \(\rightarrow\) Tables. The table can be viewed by right-clicking the table and then selecting view rows of data.
4.5.3 Inserting rows of data to the airlines table
Currently the table is empty. We add one row to illustrate the use of Insert statement in SQL. Let us check the attribute table using QGIS.  The insert statement has following syntax (structure).
INSERT INTO Table-name (Column-name(s)) VALUES(data in the row);Therefore, we can insert the first row with the following statement. (Copy the SQL statement below and paste to the SQL window and run).
INSERT INTO airlines (rowid, index, id, name, alias, iata, active) VALUES(1, 0, '1', 'Private Flight', '\N', '-', 'Y');As shown in the above INSERT statement, - We have omitted the columns whose value is NULL. - String values are used with single-quotes.
After running the above statement, you can check the table contents as explained above. Let us now add one more row, this time with one wrong value. We will learn how to update a value in the next step. Run the following SQL.
INSERT INTO airlines (rowid, index, id, name, alias, active) VALUES(2, 1, '2', '135', '\N', 'Y');After running this code, we realize that we have omitted few columns which does have values. We can use UPDATE STATEMENT to correct this error. UPDATE Statement has following syntax.
UPDATE table_name SET column1 = value1, column2 = value2, ... [WHERE condition];Based on the above syntax, let us run the following SQL. Remember that if you don’t put WHERE condition, all the rows will be updated and it will be irreversible.
UPDATE airlines SET name='135 Airways', icao='GNL', callsign='GENERAL', country='United States', active='N' WHERE rowid=2;Now, when we view the data, it will look similar to the original data table.

We now learned how to insert a row to the table and update it based on the given condition. However, it is quite cumbersome to insert each row manually. QGIS can access different databases including PostgreSQL and PostGIS. We can directly import and export tables from/to PostgreSQL from QGIS. The steps are explained in the following sections.
4.5.4 Accessing PostgreSQL database from QGIS
Now we are going to export the database tables from QGIS. We need to connect to the database. Follow the steps below:
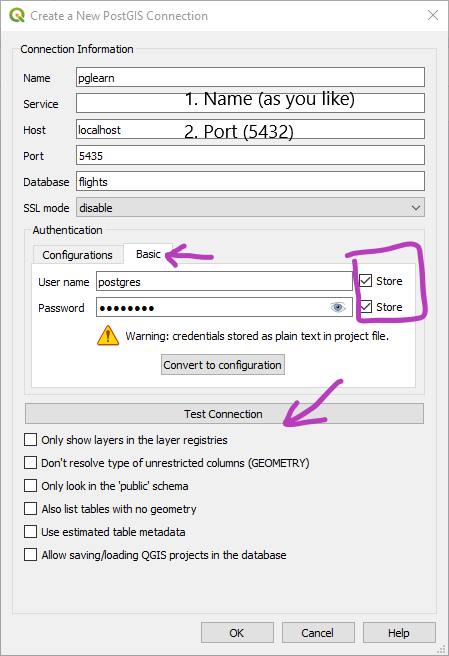
In the QGIS browser right-click PostGIS and click New Connection

In the new dialog box fill the required parameters. Fill the user name and password and click Test Connection. If the connection is successful then click OK. Ignore the warning about password.
Now we are going to import all the three tables from SQLITE to PostgreSQL. From QGIS menu open Database \(\rightarrow\) DB Manager . If you expand the PostGIS on the left panel of DB Manager you can find pglearn (connected to flights database) listed in the database-list. If you expand the database, we can find the airlines table which we just created. The table has two rows which we inserted in the above example.

We will now export the table. First of all, we need to add the tables inside flights.db to the QGIS layers. Find the location of flights.db in the QGIS browser and drag-drop to the canvas. Select all the three tables. The tables having no geometry will only be added to the list of layers.
Before exporting the tables, we need to change the flights database in PostgreSQL to spatial database. Run the following SQL while flights database is selected in the PGAdmin.
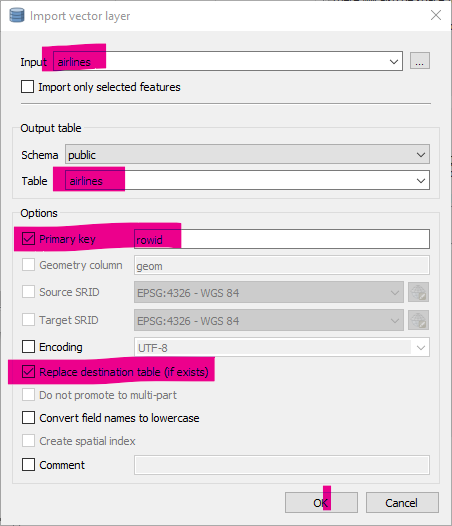
CREATE EXTENSION PostGIS;- To export a single layer from QGIS we use DB Manager. In the DB Manager, click Import Layer/File and fill the dialogbox as shown in the following figure.
- In the similar way, export two other tables. Now we have three tables listed under pglearn in the DB Manager.
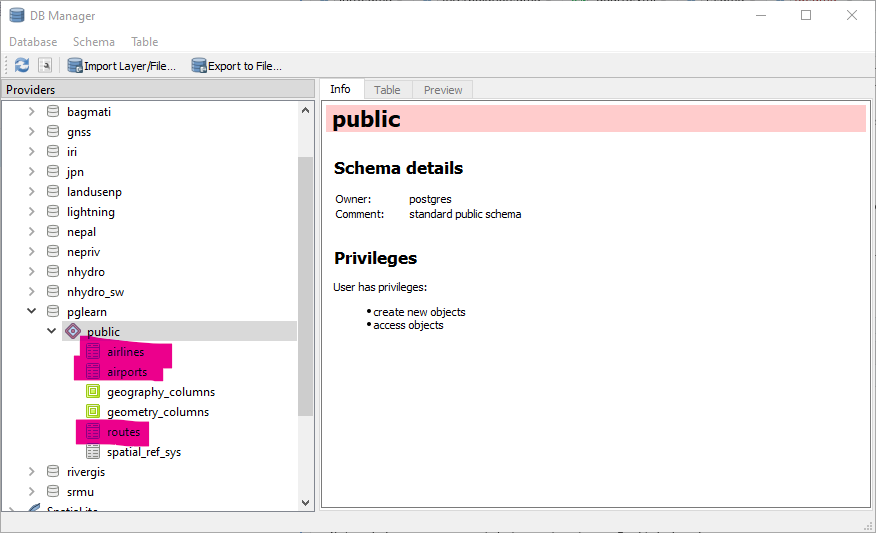
- We can check the tables listed above inside the PGAdmin too.
4.6 Spatial database
All the database tables in the above example are non-spatial tables. However, airport table has latitude and longitude columns. We can convert this table in various ways. In this tutorial, we will add a geometry point column and put the x and y values from latitude and longitude columns.
- We will use following SQL inside PGAdmin add geometry column to the airports database.
SELECT AddGeometryColumn ('public','airports','geom',4326,'POINT',2);- After running the above table, we can view data as shown below. We can see that the data in the geom column is null. We need to fill the column with geometry values.

- Run the following SQL to fill the column. It will use longitude and latitude as x and y, and the CRS will be WGS84-GCS.
UPDATE airport SET geom=ST_SetSRID(ST_Makepoint(longitude, latitude), 4326)- If we run the above SQL we get error. The reason of the error is that the latitude and longitude columns are string (character varying). But we need the columns to be float (decimal values). Again run the following SQL.
UPDATE airports set geom=ST_SetSRID(st_makepoint(longitude::double precision, latitude::double precision), 4326);- Now if we drag-drop the airport table from inside QGIS browser, we will get the point layer.

4.7 Using SQL to answer Queries
Let us try to answer few questions using the database
- Which and how many countries are listed in the airlines table?
- How many airports are listed for each country?
- Which routes are operated by RA (Nepal Airlines)
- Which airlines are operating from Delhi to Hongkong?
These information can be retrieved by asking questions. There is a standard sentence format to ask questions to the database table. This is called SQL (Structured Query Language, pronounced as S-Q-L or sequel). Let us now try to answer the above questions. Before that let us try to understand the basic SQL statements as explained in the following exercise.
4.7.1 SQL Practice
SQLs are almost identical to standard English language. Therefore, it may not need much explanation. Let us try to run the following SQLs one by one.
SELECT * FROM airlines WHERE country='Russia';
----
SELECT * FROM airlines WHERE country='Russia' ORDER BY icao;
----
SELECT id, name, icao, country, active FROM airlines
WHERE country='Russia' ORDER BY icao;
----
SELECT id, name, city, country, code, icao, altitude FROM airports
WHERE country='Nepal';
----
SELECT id, name, city, country, code, icao, altitude FROM airports
WHERE country='Nepal' AND id>2000 AND id<2100;
----
SELECT airline, airline_id, source, dest, codeshare, stops
FROM routes
WHERE source='KTM' ORDER BY dest DESC;
The SQL statements are fairly simple and follow general spoken language. Let us summarize what we observed by executing above SQL statements.
- General structure of SQL statement is SELECT [columns] FROM [table name] WHERE [Where clause joined with AND] ORDER BY [columns] LIMIT [number of rows].
- Check the information of any of the 3 tables as explained in above exercise. We can see that each column has a type. For example, airlines table has 9 columns. The column named index is INTEGER while all the others are TEXT.
- In the above SQL statements, the words have different colors. The blue colored words are keywords. Column names are black. Structure of where clause is writeen in the form: column
value. Where operator can be =, >, <, LIKE, UNLIKE etc. Note that while comparing text column, the value should be enclosed in single quote. Integer and real values should not be enclosed into quotes.
4.8 Using SELECTION statement
We have got basic idea of the kinds of queries we can execute in SQLite database. Now let us try to explore some more functions of database manager. Check the output of following SQL statement.
SELECT airline, airline_id, source, dest, codeshare, stops
FROM routes WHERE source=’KTM’ ORDER BY dest LIMIT 5;
This sql produce the following table
What is the fullname of airline in the above table? What does BHR mean in the dest column? These data are kept in other two tables airlines and airports. Can you find which column of routes is related to airlines table? Similarly, which column of routes is related to airports?
We can query multiple tables in a single query when one column of a table is related to any column of another table. Write the following SQL statement and execute. Following SQL is a single SQL. It can be written in multiple lines with semicolon at the end.
SELECT routes.airline, routes.airline_id, routes.source, routes.dest,
airlines.name,
airports.city, airports.country
FROM routes, airlines, airports
WHERE source='KTM'
AND routes.airline_id =airlines.id
AND routes.dest_id=airports.id
ORDER BY dest LIMIT 5;
The above sql will produce the following table
| airline | airline_id | source | dest | name | city | country |
|---|---|---|---|---|---|---|
| EY | 2222 | KTM | AUH | Etihad Airways | Abu Dhabi | United Arab Emirates |
| YT | 16133 | KTM | BDP | Yeti Airways | Chandragarhi | Nepal |
| YT | 16133 | KTM | BHR | Yeti Airways | Bharatpur | Nepal |
| YT | 16133 | KTM | BIR | Yeti Airways | Biratnagar | Nepal |
| RA | 3637 | KTM | BKK | Nepal Airlines | Bangkok | Thailand |
What did we do in the above statement? We selected columns from three tables such that airline_id column of route table and id column of airlines table are equal. Similarly, dest_id column of routes table is equal to id column of airports table. With practice, this type of simple SQLs can be easily mastered. However, it is possible to write fairly complex SQLs for which you need to refer some proper reference on database management.
Now let us try to answer the questions in Section Section 4.7. Following is the solution to each question. The SQL statements is self explanatory. Try to test some more questions.
- Which and how many countries are listed in the airlines table?
This question needs to be split into two. First let us try to find which countries are listed in airlines table. If you try to list all the rows, same country will be listed multiple times. Therefore, we need to use UNIQUE keyword. Try the following SQL.
SELECT DISTINCT(country) FROM airlines;You can see that one row in the result shows NULL value. Which means that some of values in the country column are empty. To omit NULL values in the result, we use sql IS NOT NULL as shown in following SQL.
SELECT DISTINCT(country) FROM airlines
WHERE country IS NOT NULL;
You can find the number of countries listed in the airlines table by simply scrolling down the output of the SQL. However, there is standard SQL query for counting the number of results, as shown below.
SELECT COUNT( DISTINCT(country)) FROM airlines
WHERE country IS NOT NULL;- How many airports are listed for each country?
This question is simple one. We need to use (group by) keyword to find the number of airports in each country as shown in the following SQL example.
SELECT country, count(*) FROM airports
GROUP BY country;- Which routes are operated by RNA (Nepal Airlines)?
This is question is not very hard. You can try by yourself before looking at the SQL below. Remember that you need to combine all the three tables as the routes table does not have the listing of the name of airlines or the full name of source and destination.
SELECT airlines.name, airports.city, routes.dest
FROM routes, airlines, airports
WHERE airlines.icao = 'RNA' -- International Civil Aviation Organization (ICAO) code for airport name
AND airlines.id = routes.airline_id
AND airports.id = routes.source_id;
In the above code, we introduced comment. Anything written after – is treated as comment and will not be executed. We get following table as output by executing the above SQL.
| name | city | dest |
|---|---|---|
| Nepal Airlines | Doha | KTM |
| Nepal Airlines | Hong Kong | KTM |
| Nepal Airlines | Kathmandu | KUL |
| Nepal Airlines | Kathmandu | HKG |
| Nepal Airlines | Kathmandu | DOH |
| Nepal Airlines | Kathmandu | BKK |
| Nepal Airlines | Kuala Lumpur | KTM |
| Nepal Airlines | Bangkok | KTM |
This table does not show the destination. If you replace airports.id = routes.source_id by airports.id = routes.dest_id then you will get only the name of destination city. Therefore, you need to join two different selection statements as below. We create two selections. The first selection statement compares the id of table airports with source_id of routes table. In the second statement we compare the id of airports table with dest_id of routes table. The two tables are named as t1 and t2 respectively. Finally we compare the outputs of two selection statements by using common column which is index column of routes table.
SELECT t1.name, t1.city AS from_city, t2.city AS to_city
FROM
(SELECT routes."index" id1, airlines.name, airports.city, routes.dest
FROM routes, airlines, airports
WHERE airlines.icao = 'RNA' -- ICAO code for airport name
AND airlines.id = routes.airline_id
AND airports.id = routes.source_id) AS t1
LEFT JOIN
(SELECT routes."index" id2, airlines.name, airports.city, routes.source
FROM routes, airlines, airports
WHERE airlines.icao = 'RNA' -- ICAO code for airport name
AND airlines.id = routes.airline_id
AND airports.id = routes.dest_id) AS t2
on id1 = id2
4.9 Concept of Views
Above SQL is quite complex. We can create even more complex SQLs. However, things can be simplified by using views. Views are a kind of tables created by using a SQL from existing table. We can create a view in PostgreSQL by using following SQL. In the following SQL we are using the SQL in above section somewhere. We have omitted the icao=‘RNA’ so that all the airlines are listed. The following SQL will create a view Routesrc and it will contain the output of this SQL. The view can be treated as a table.
CREATE or REPLACE VIEW Routesrc
AS
(
SELECT routes."index" id1, airlines.name, airports.city, routes.dest
FROM routes, airlines, airports
WHERE airlines.id = routes.airline_id
AND airports.id = routes.source_id
);
The Views are listed under schema \(\rightarrow\) public \(\rightarrow\) Views as below.

Now we can create another view based on the destination id.
CREATE or REPLACE VIEW Routedest
AS
(
SELECT routes."index" id2, airlines.name, airports.city, routes.dest
FROM routes, airlines, airports
WHERE airlines.id = routes.airline_id
AND airports.id = routes.dest_id
);
Finally we can join the above views instead of making it too complex.
SELECT t1.name, t1.city AS from_city, t2.city AS to_city
FROM
routesrc t1
LEFT JOIN routedest t2
ON id1 = id2
where t1.name like 'Nep%'
We have completed various tasks related to database creation and management using PostgreSQL database. We can do some more things with this database like. We can join the route-airport and destination airport to create lines. Please find other tasks you can think of. Enjoy!